Smarter Standups: Harness the Power of Slackbot and Jira Integration

In our last blog, we learned how to set up a Slack bot using Bolt, the Slack library for building Slack apps with node.js. In this tutorial, I’ll show you how to integrate the Jira API and Slack bot to make your daily standup shorter or may be no standup at all. 😉
Introduction
Are you tired of constantly switching between Slack and JIRA to keep track of your project’s progress? What if there was a way to automate this process, giving you more time to focus on the actual work? Well, there is and we’ll see it in this blog. I will walk you through the process of setting up a cron job that fetches a JIRA filter, analyses it, and posts the ticket status on Slack, all using JavaScript. To make things even simpler, we will be using the jira-client npm package as our JIRA SDK. So let’s dive in!
What is Slack and Jira?
Before diving into the integration details, let’s briefly introduce the two tools.
- Slack is a versatile team collaboration platform that allows real-time messaging, file sharing, and integration with various third-party applications.
- Jira, on the other hand, is a powerful project management tool that helps teams track and manage tasks, issues, and projects with great precision.
Prerequisites:
Before we get started, make sure you have the following:
· Node.js v12 or higher installed on your machine
· npm installed on your machine
· A basic understanding of JavaScript, Node.js
. A slack bot. You can refer this article for how to create a slack bot. We’ll be using this slackbot created in this article for posting the daily report on slack.
Steps to Implement Jira-Slack Integration:
To implement the Jira-Slack integration, you can follow these steps:
Step 1: Create a JIRA Filter
Before setting up the integration, you need to create a JIRA filter that targets the issues you want to monitor in your project. To do this, follow these steps:
1. Log in to your JIRA account and navigate to the “Issues” tab.
2. Click on “Search for issues”.
3. Use the search bar and filters to find the issues you want to monitor. For example, we’ll be using below search query —
sprint in (<SPRINT_NAME>) AND (due = EMPTY OR due < 1d AND status != done) AND status != doneThis search query will get all the ticket from <SPRINT_NAME> which has not been completed and has empty due field or due is already passed. You can replace your sprint name with <SPRINT_NAME>.
4. Once you have your desired list of issues, click on “Save as” and enter a name for your new filter.
5. Here we have created a filter which will provide all the tickets where due date is not filled or it is lagging behind it’s due date but status is not done yet.
Step 2: Set Up the Node.js Script
To fetch the JIRA filter and analyse the ticket status, you’ll need to create a Node.js script. Follow these steps to set up the script:
1. Create a new folder for your project and open it in the terminal.
2. Run “npm init” to create a new ‘package.json’ file and add the libraries.
3. Install the required dependencies. We’ll see in step 3.
4. Now, create a new file called “jira-slack-integration.js”.
Step 3: Install the required packages
We need to install the necessary packages —
1. jira-client: A node.js module, which provides an object oriented wrapper for the Jira Rest API.
2. node-cron: This module allows you to schedule task in node.js using full crontab syntax.
3. slack/bolt: As per it’s description, it is swiftest way to start programming with the Slack Platform.
Step 4: Fetching the Jira details
We’ll use jira-client to initiate a JIRA client for performing further operations —
const JiraClient = require('jira-client');

// Initialize JIRA client
const jira = new JiraApi({
  protocol: process.env.JIRA_PROTOCOL,
  host: process.env.JIRA_HOST,
  username: process.env.JIRA_ID,
  password: process.env.JIRA_PASSWORD,
  apiVersion: '2',
  strictSSL: true,
});
Replace the placeholders `JIRA_PROTOCOL`, `JIRA_HOST`, `JIRA_ID`, `JIRA_PASSWORD` with your actual information.
Upon successful creation of the instance, the subsequent step involves procuring the filter details. To achieve that, we will employ the ‘jira.getFilter()’ function from ‘jira-client’. This function will enable us to acquire the filter details corresponding to the specified filter id.
Following the acquisition of the filter details, our attention will be directed towards retrieving the details for each ticket that is present within the filter. To do so, we will utilize the ‘jira.getIssuesFromFilter()’ and ‘jira.findIssue()’ functions.
Once we have received the ticket details, the next course of action will be to parse these details into our preferred format. With the parsed data at our disposal, we will proceed to publish it on Slack by making use of the slack/bolt’s ‘postMessage()’ function.
Below is the complete code snippet.
require('dotenv').config({});

const { slackApp } = require("../slack/app");
const { filterOwner, status, jiraSlackMapping } = require("./constant");
const { postMessageOnSlack, getFields, getDueDateDiff  } = require("./utils");

const checksOnTicket = (issueId, ticketDetails) => {
  const ticketName = ticketDetails.summary;
  const ticketLink = `${process.env.JIRA_PROTOCOL}://${process.env.JIRA_HOST}/browse/${issueId}`

  var message = `\n\n<${ticketLink}|${issueId}>: ${ticketName}`;

  // Check for assignee
  const assignee =  ticketDetails.assignee?.name;
  const ticketOwner =  assignee || filterOwner;
  if(!assignee){
    message += '\n*Assignee:* Missing.';
  }

  // Check for due date
  const dueDate = ticketDetails.duedate
  if(dueDate){
    const lag = getDueDateDiff(dueDate);
    if(lag < 0){
      const lagAbs = Math.abs(lag);
      message += `\n*Due date*: Lagging behind by ${lagAbs} day.`;
    }
  } else {
    message += `\n*Due Date:* Missing.`;
  }

  // Check for ticket status
  const ticketStatus = ticketDetails.status.name;
  if(ticketStatus){
    message += `\n*Status:* ${ticketStatus}`;
    if(ticketStatus === status.blocked){
      const blockComment = ticketDetails.customfield_21200;
      message += `\n*Block Comment:* ${blockComment}`
      message += ' - Please add your tentative due date in this thread';
    }
  }

  const ticketOwnerSlackId = jiraSlackMapping[ticketOwner]?.slackMemberId || assignee;
  message += `\n*Assignee / Owner* - <@${ticketOwnerSlackId}>`;

  return message;
}

// findIssue
const getIssueDetails = async (issueId) => {
  try{
    const fields = getFields();
    const issue = await jira.findIssue(issueId, '', fields);
    const statusUpdate = checksOnTicket(issueId, issue.fields);
    return statusUpdate;
  }
  catch(err) {
    console.error(err);
  }
}

// getIssueDetailsFromFilter
const getIssueDetailsFromFilter = async (jql) => {
  try {
    const result = await jira.getIssuesFromFilter(jql);
    var concatenatedStatusChecks  = '';
    const issues = result.issues || [];
    for (let i = 0; i < issues.length; i++) {
      const ticketId = issues[i].key;
      const statusUpdateChecks = await getIssueDetails(ticketId);
      concatenatedStatusChecks += statusUpdateChecks;
    };
    return concatenatedStatusChecks;
  }
  catch(err){
    console.error(err);
  }
}

// getFilteredTickets
const getFilteredTickets = async (filterId) => {
  try{
    const filter = await jira.getFilter(filterId);
    const jql = filter.jql?.replace(' ', '%20')
    const pendingTicketsDetail = await getIssueDetailsFromFilter(jql);

    const filterOwnedBy = jiraSlackMapping[filterOwner]?.slackMemberId || assignee;
    var message = `--------------------------------------------------------------------
Filter: <${filter?.viewUrl}|${filter.name}>
*Owner:* <@${filterOwnedBy}>
--------------------------------------------------------------------`;
    message += pendingTicketsDetail
    postMessageOnSlack(slackApp, message);
  }
  catch(err) {
    console.error(err);
  };
}
For further understanding of the “slackApp”, kindly refer to “Server setup” section of my previous blog post where i have elaborately discussed how to create it and use it. I have imported the same bot in this file.
Utils which have been used in above snippet —
const { slackChannel, fields } = require("./constant");

// postOnSlack
const postMessageOnSlack = async (app, message) => {
  try{
    await app.client.chat.postMessage({
      channel: slackChannel,
      text: message
    })
  } catch (err) {
    console.log('error while posting in channel - ', err)
  }
}

// get concatenatedFields
const getFields = () => {
  const concatenatedFields  = Object.keys(fields).map(key => fields[key]).join(', ')
  return concatenatedFields;
}

const getDueDateDiff = (date) => {
  const dueDate = new Date(date);
  // TODO: Change this to current date
  const today = new Date('2023-06-17');
  var diff = new Date(dueDate.getTime() - today.getTime());
  var oneDay = 1000 * 60 * 60 * 24;
  const lag = Math.round(diff / oneDay)
  return lag;
}
Constants you can keep in below format —
exports.filterOwner = YOUR_JIRA_ID;
exports.slackChannel = SLACK_CHANNEL_ID;

exports.status = {
  blocked: 'Blocked',
  backlog: 'Backlog'
}

exports.fields = {
  SUMMARY: 'summary',
  ISSUELINK: 'issuelinks',
  ASSIGNEE: 'assignee',
  STATUS: 'status',
  DUEDATE: 'duedate',
  ISSUETYPE: 'issuetype',
  PRIORITY: 'priority',
  COMMENT: 'comment',
  BLOCKREASON: 'customfield_21200'
}

exports.jiraSlackMapping = {
  "MEMBER_1_JIRA_ID": {
    "name": MEMBER_1_NAME,
    "email": MEMBER_1_EMAIL,
    "slackMemberId": MEMBER_1_SLACK_MEMBER_ID,
  },
  "MEMBER_2_JIRA_ID": {
    "name": MEMBER_2_NAME,
    "email": MEMBER_2_EMAIL,
    "slackMemberId": MEMBER_2_SLACK_MEMBER_ID,
  },
}
Replace the placeholders YOUR_JIRA_ID, SLACK_CHANNEL_ID, MEMBER_1_JIRA_ID, MEMBER_1_NAME, MEMBER_1_EMAIL, MEMBER_1_SLACK_MEMBER_ID
Step 6: Setting up the cron job for daily status
var cron = require('node-cron');

cron.schedule("30 10 * * 1-5 ", () => {
  console.log('\n\n\n===============================================\n')
  getFilteredTickets(filterId); // Replace your filter id with filterId.
}, {
  scheduled: true,
  timezone: 'Asia/Calcutta'
})
In the cron syntax:
— The first field is for minutes (30).
— The second field is for hours (10).
— The third field is for the day of the month (* means any).
— The fourth field is for the month (* means any).
— The fifth field is for the day of the week (1–5 means from Monday to Friday).
Step 7: Run the Node.js Script
You can simply run this node script by using below script.
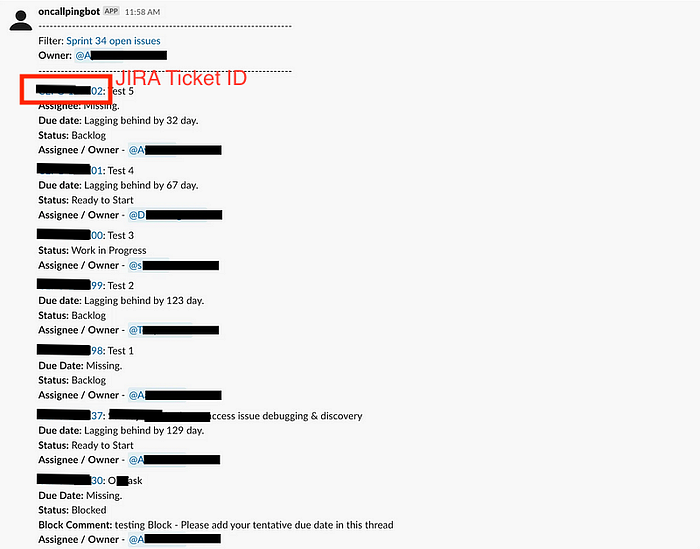
node jira-slack-integration.jsWe can see, it is informing the filter owner for those tickets which are lagging behind its due date with below checks—
1. Check for assignee
2. Check for due date
3. Check for ticket status
Output —
Conclusion:
In conclusion, integrating Jira with Slack brings substantial benefits to project management and team collaboration. By automating ticket status updates and streamlining communication, we can make the daily standup shorter.
#slack #jira #Standup #DSU #javascript